In competitive shooter games, what wins a match is often not reflexes but information. Being able to hear whether an opponent is coming from behind you or from a side corridor, whether a door opens and closes, or whether a vehicle starts up in the distance means your ears catch what the screen does not show you. Wardogs is a game built on this logic: here sound is not merely atmosphere but a direct survival tool. Despite this, most players spend hours on graphics settings and key bindings while barely ever opening the audio tab. Yet a poorly configured audio mix can lose you more matches than even the best aiming sensitivity. Below, we examine step by step the recommended audio settings for Wardogs, the reasoning behind each value, and how to adapt these settings to your own headset.
Why Are Default Audio Mixes Not Competitive?
Game studios usually prepare the audio mix like a film scene: they want explosions loud, music emotional, and gunshots impressive. This approach works perfectly in a single-player campaign, but it slows you down in matches where you face a real human. That is because the actual signals you need to distinguish — footsteps, cloth rustling, a single distant shell casing — are buried under the music and explosions. That is why a good audio setup is made with the goal of "more accurate sound," not "more sound." In Wardogs, too, the aim is not to turn every channel all the way up; it is to bring information-carrying channels forward and push distracting ones into the background.
The second problem is that sound forms a constant wall of noise. During a firefight, explosions, gunshots, radio announcements, and teammates' voices all hit you at once; in that pileup, it becomes hard to distinguish which sound is real. If the mix is not set properly, even your teammate's "on your right" warning gets lost amid the gunfire. With the right configuration, however, each sound layer stays in its place: gunshots are loud but do not drown out communication, music is in the background or completely off, and footsteps are heard clearly. In short, a good audio setup does not let your ears hear more things; it lets you pick the right one from fewer things.
Volume Levels: Which Sounds Should You Turn Up and Which Should You Turn Down?
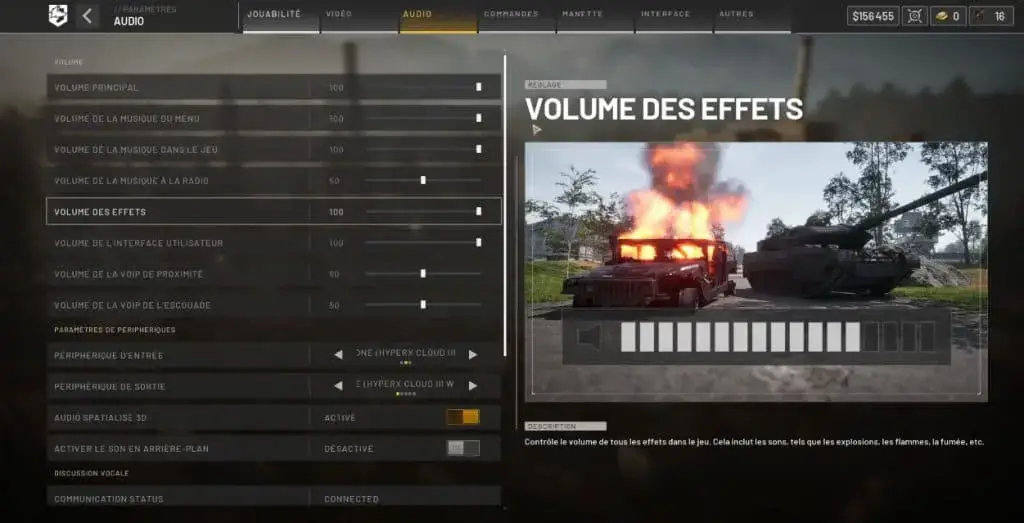
Wardogs' audio menu has eight different audio channels that operate independently of one another. Since each of these channels represents a different function, you need to separate them according to their purpose rather than giving them all the same value. The recommended configuration is as follows:
- Master volume — 50: The main valve that controls the entire mix from above. Keeping it at medium level instead of turning it all the way up both protects your ears from sudden sound spikes and leaves room for fine-tuning other channels.
- Menu music — 0: Music playing in the lobby and menus gives you no information during gameplay. Turning it off completely keeps you from getting distracted while navigating menus.
- In-game music — 0: One of the most critical settings. Background music masks subtle signals such as footsteps; when it is off, ambient sounds come forward noticeably.
- Radio music — 30: Left at a low level rather than turned off completely; this prevents the music from drowning out other layers without missing sounds coming from the radio channel.
- Effects volume — 100: Gunshots, explosions, footsteps, and environmental sounds are gathered here. Keeping this channel at maximum brings the game's information-carrying layer forward as much as possible.
- Interface volume — 100: Feedback such as menu clicks, command, and ping sounds. Keeping it high makes in-game commands easier to hear.
- Proximity VoIP volume — 50: The voices of nearby players; it should be neither completely suppressed nor allowed to drown everything out, so it is kept at a balanced level.
- Team VoIP volume — 50: The communication channel with your own squad, set to the same level as proximity chat so both are heard equally.
The logic here is based on hearing all sounds at once while none of them drowns out another. Keeping master volume at 50 while raising effects to 100 may seem contradictory at first glance; but while the master valve acts as a ceiling, the effects channel becomes the highest layer beneath that ceiling. This way, gunshots stay sharp while sudden explosions that could damage your hearing are also limited to some extent. Lowering the music channels to zero, on the other hand, clears the audio space and makes room for the game's actual information layer.
The recommended value of 30 for radio music is especially noteworthy, because the goal here is not to eliminate music completely. It preserves the radio channel's presence in the game while keeping it in the background; thus you neither lose it entirely nor does it suppress other sounds coming over it. Having both VoIP channels at 50, meanwhile, means not taking sides in communication: a nearby player's voice and a teammate's voice are heard with the same weight. If your microphone is very sensitive or your team talks constantly, you can move these two values within the 40–60 range to your liking; however, lowering one and raising the other is a choice that determines which channel is prioritized in communication, so it should be made carefully.
Hardware Side: Input, Output, and 3D Spatial Audio
Another issue as important as volume levels is which device the sound goes into and which device it comes out of. A wrongly selected output device can make everything pointless no matter how well you configure the settings. The recommended hardware configuration is as follows:
- Input device: The microphone you use. If there are multiple recording devices in the system (for example, a laptop's built-in microphone and an external headset microphone), you need to manually select the correct one.
- Output device: Your headset. Choosing a headset instead of speakers significantly improves both directional perception and audio detail.
- 3D spatial audio: Enabled. Since this is the layer that lets you feel the direction and distance of sound, it is not recommended to turn it off.
- Background audio: Disabled. It prevents sound from continuing to play when the game window is not in the foreground, reducing both resource usage and distraction.
Headset choice plays a key role here, because the whole advantage of multichannel audio depends on signals reaching each ear separately. When you play with speakers, both the room's acoustics and the sound reaching both ears mixed together blur your directional perception. Having 3D spatial audio enabled is the most important setting that lets you tell whether an opponent is to your right or left; when it is off, sounds flatten and the sense of distance weakens. Turning off background audio is especially useful for players who frequently Alt+Tab: when the game does not keep running in the background, both system resources are freed up and you do not get confused while outside the game.
Another detail concerns the audio output method. Enabling your headset's own virtual surround sound software and the game's 3D audio setting at the same time can sometimes cause a conflict. If you notice that your directional perception is impaired in such a case, the most practical solution is to turn off one of the two layers and test. In addition, if you use a wireless headset, latency and connection drops can also delay audio cues; in critical matches, a wired connection is still the most reliable option.
Team Communication: VoIP and Microphone Calibration
In Wardogs, audio is not only about hearing; it is also about being heard. In a match where you cannot talk to your teammates, even the best headset is not enough. That is why the recommended settings on the voice chat side are listed as follows:
- Voice chat (general): Enabled. Turning the channel off completely makes in-team coordination impossible.
- Team voice chat: Enabled. It must be on so you can speak directly with your own squad.
- Proximity voice chat: Enabled. It is necessary for communicating with players who come near you.
- Microphone volume: 50. A balanced value as a starting point; you may need to raise or lower it depending on your own microphone.
- Microphone test: The tool used to verify the setting.
Having proximity voice chat enabled also directly affects the social side of the game: being able to talk to players around you can sometimes even help resolve a fight before it starts. However, there is a balance to watch; especially in intense firefights, proximity chat being too loud can drown out footsteps. That is why in the recommended configuration both VoIP channels are kept equal and at medium level. This way, both tactical information from your squad and warnings from nearby players can be followed at the same time.
On the microphone side, the most practical method is to use the microphone test offered by the game. Alternatively, you can ask a trusted friend to listen to your voice and evaluate its clarity. When you speak, your voice should be neither too quiet nor loud enough to clip; an excessively high microphone volume is both annoying and useless for your teammates. A quiet microphone, on the other hand, leads to your words being asked to be repeated over and over, and the seconds you lose in the meantime can decide the match. The ideal point is the level where you are clearly understood at a normal speaking tone.
Background noises such as other people talking in the same room, a TV left on, or a mechanical keyboard's sound make things harder for your team no matter how good your microphone settings are. That is why, if the game offers a push-to-talk-like option, using it ensures healthier communication in the long run. Also, speaking only when necessary instead of leaving your microphone gain always open both protects your team from unnecessary noise and gives you room to listen to your own audio cues.
Accessibility Options and Common Mistakes
In the last section of the audio menu, there is an accessibility-focused option: a setting prepared for tinnitus. This option stands out as a convenience added to provide a more comfortable experience for players who experience tinnitus. In the recommended competitive configuration, however, it is left off, because the standard audio signature presents the game's information-carrying layers in their clearest form. Of course, if you have such a sensitivity, keep in mind that comfort for a few matches may be more important than a small loss of information. Settings are a matter of personal balance, and your health always comes first.
As for common mistakes, the first is "turning everything all the way up." Raising master volume to the maximum and setting effects to maximum does not make sound clearer; it only increases noise and ear fatigue. The second mistake is leaving in-game music on; this is the most common reason for not being able to hear footsteps. The third is leaving speakers selected as the output device and not noticing the loss in directional perception. The fourth is setting everything once and never checking it again: when your headset changes, a new microphone is connected, or the game's audio engine is updated, the whole balance should be reviewed from scratch.
Testing and Adapting the Settings to Yourself
The values here are a starting point; the final decision is always your ears. Even two players using the same headset may prefer different sound profiles, because the headset's drivers, the pressure of the headband, and personal sensitivity change perception. Therefore, after applying the settings, consciously observe footsteps, explosion directions, and team communication for at least a few matches. If you keep missing a sound, the problem is most likely that one channel is drowning out another; lowering unnecessary channels is usually a more effective solution than buying a new device.
When testing, this simple checklist will do the job: Are menu and in-game music really off? Are effects at maximum? Is 3D spatial audio on and background audio off? Can you hear both team and proximity chat channels, and does your microphone come through clearly? When you can answer these four questions clearly, you have largely reached a correct configuration. The remaining fine-tuning depends entirely on your play style: if you play more aggressively, you can bring effects forward; if you coordinate more, you can nudge the VoIP channels up a notch.
Finally, audio settings should not be considered on their own. Sound, graphics settings, and key bindings form a single whole; just as visual clarity helps you spot opponents earlier, audio setup helps you hear them before they hear you. A player who configures all three together and tests them consistently over several matches gets ahead of a player who only practices aim and neglects the rest. A properly set up audio configuration is a silent advantage that you do not notice during a match but clearly feel when you tally up the results.